


Blog
Silver Brooch Crafted


For some time now, the brooch has been enjoying a second youth. Previously associated only with grandma’s jackets and wool sweaters, it is conquering the fashion world, adorning the creations of world-renowned designers such as Marc Jabocs and Karl Lagerfeld. It shows on that the silver brooch is back in grace and is increasingly used, also in the styles of the younger generation.
Grab your tools and your material
Pin backs come in a variety of designs. A pinback should complement the aesthetic of your work while also providing a strong, solid hold. Make your pinback appear to be part of a planned design.
Simple mechanics are used in the pin backs shown here. Other pins are far more sophisticated, and may or may not include safety catches. I’ll probably write about those someday, but for now, let’s start at the beginning!
Before starting on your final creation, We recommend that you build a couple different types of pin backs.
Making a few pin backs will assist you in determining which sort of pin back will work best for you, as well as demonstrating why the five basic fundamentals are so important.
https://www.youtube.com/watch?v=BgnHunXyxwM
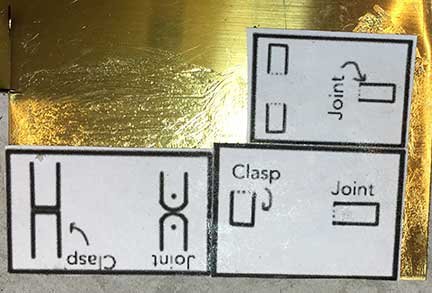
The 5 Basic Principles of a Pin Back
- The Pin Stem: it’s the pin’s lengthy, pointed portion. Pin stems that are rigid and springy are perfect. It will have a tapering shape and a high polish. Because a rounded tip will move the fibers aside rather than ripping through them, the stem’s tip should be rounded. Round, firm, and springy wire should be used for stems.
- The Catch: The catch’s purpose is to hold the pin stem in place and, in most cases, to conceal the point of the stem. There are numerous varieties of captures, which we will discuss in greater detail below. Catches come in a variety of shapes and materials. They don’t have to be super strong — just strong enough to hold the stem in place and endure use.
- The Pin-Stem Joint: This is where the pin stem meets the pin. There are a multitude of styles to choose from, just like stems and catches. The joint must be strong enough to withstand stem movement and maintain its shape so that the pin stem does not fall out.
- The Spring: A mechanism that causes the pin stem to be tensioned while it is held in the catch, whether it is just a bend of wire or a bridge.
- The Lift, also known as a Spacer, is one type of spacer; however, there is another type of spacer (see below): Its job is to lift the pin stem off the pin back’s surface, thereby creating spring. A spacer isn’t always required. The type of wire used for the pinback, as well as the design, have a significant impact.
Note that Double Pin Backs operate best when the legs (stems) are at least 3 times longer than the distance between them.
There you can see how to calculate the spin legs distance
Try not to make the joint too close to the catch – it makes it very difficult to open and close the pin!
Jeweller’s rouge should not be rubbed on gems because the abrasives can scratch them.
It is not a good idea to try to remove scratches from silver coins because this will devalue them.
Materials for Construction
FOR JOINTS AND CATCHES, SHEET, TUBING, AND WIRE
For your catches and joints, you’ll want to use stiffer metals. Here’s a quick rundown of good clasp metals: 10K, 12K, 14K, Sterling Silver, Argentium Silver, Steel, Stainless Steel, Platinum, Nickel, etc. Brass, Bronze, Golds: white, yellow, or green – 10K, 12K, 14K, Sterling Silver, Argentium Silver, Steel, Stainless Steel, Platinum, Nickel, etc.
WIRE FOR PIN STEMS WIRE FOR PIN STEMS WIRE FOR PIN STEMS
For pin stems, I like 925 sterling silver because it:
- Copper flashing is not caused by it interacting with sodium bisulfate pickle.
- It has a robust and springy feel about it.
- It polishes to a brilliant gleam.
- It is low-cost.
Make sure your pin stems are work-hardened before using them; this will prevent them from losing their shape and give them more spring, allowing them to snap into your catch.
If you’ve mistakenly annealed them, tighten the wide end in a leather-protected vise, then grip the pointed end with tape-coated flat pliers (don’t want to ruin our lovely stem!) and twist the wire in either way.
Catches and Joints with Sheet Tubing and Wire Gauge
Typically, you’ll want to employ a gauge to confirm that your catches and joints are strong and stable.
A tubing with a thicker wall will function better, endure longer, and keep the pin stem stable and secure.
Wires of 18 to 16 gauge for catches will bear the strain.
Sheet metal should be 22 gauge or above for the strongest connections.
Gauge of Wire
The gauge of wire you use will be heavily influenced by the size of your brooch and its pin.
The gauge you choose will also be influenced by the type of wire you use. You should think about the type of material your pin will pass through.
A thick, loosely knit sweater, rather than a silk blouse, will be more tolerant of larger gauge pin stems.
Use 22 – 18 gauge if you’re constructing brooches that will need to work with a variety of fabrics.
Make test pieces first, then wear them to check how they hold up over time and with different fabrics.
A finer pin stem can be used on a lighter brooch.
Pin Stem End sufficiently shaken.
(A pin stem tip that is suitably rounded.)
Consider whether the stems are creating tearing or forming permanent holes.
If this is the case, you might want to include a note (if you’re selling your brooch) saying it’s best with: fabrics or double-check the point of your stem. Check to see if it’s rounded.
You might want to start by putting together a little book of material samples to test your stems on.

Construction:
Using the same piece of sheet metal to lay out many pinbacks.
Take note of how I’m using the machined edge (bottom of image) to butt the edges of each back together.
You’ll only have to make one cut per two edges this way.
Here, we’re not that sluggish!
The wire for the pin stem is being measured.
MEASURE THE LENGTH FROM THE JOINT TO THE CATCH FOR A DOUBLE PIN STEM.
That’s twice as much.
Add it to the width of your joint.
Add a few more millimeters for bends and filing – roughly 2–4 millimeters.
IN THE CASE OF A SINGLE PIN STEM
Take a measurement from the hinge to the catch.
Take a measurement of the hinge’s breadth.
Decide whether you’re going to make a “foot” or a coil, then add more material accordingly.
Spacers
![]()

If you’re sewing a brooch for heavy fabric, such as a jacket or a sweater, you might need to use a spacer to give the pin stem extra room for fabric.
To file a long groove into the spacer, use a joint file with the same gauge as the tubing.
The spacer should be manufactured of a gauge wide enough to accommodate the tubing.
Placement of Pin Back

Make sure your pin is centered in the top third of your piece when reattaching it.
For right-handed folks, point the catch downwards and position it on the left side (if looking at the back of the piece).
The pin stem should be centered on the item if you’re centering it vertically. The catch should be on the bottom and the joint on the top.
Fin
Pin backs and brooch backs come in a huge variety of styles. Simply click on some of the following links to learn how to create your own. Have fun with it.

Reference Materials
- Fluxplay: Simple Brooch Pin Backs. October 12, 2011. Web.
- Angulo, Lorena. Krafthaus. Behind the Brooch. January 11, 2012. Web.
- Lorena Angulo: Behind the Brooch: A closer look at backs, catches and pin stems.
- Randy Hengl. Guild of Metalsmiths , Metalsmith – V 21.2 : Springs. June, 1997. Web. Making and working with springs and spring steel.
- Brooch Backs and Jewelry Details, Pinterest. Web.
Here you have an exemple how to do. Enjoy!
Conclusion:
We have taken a lot of time to bring you the most comprehensive article on “how to clean silver tea sets”.
We hope you’ve enjoyed and appreciated learning more about this topic.
Don’t hesitate to subscribe to our private club to be, you will receive as a gift a 15% discount code valid on the whole store.
You will also receive a sneak preview email when a new post appears on full-silver.com
